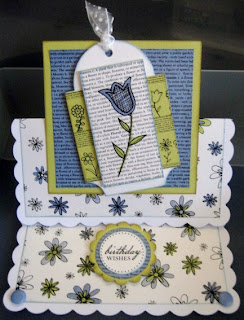
These are the cards designed for a class at Cardinal Colours Retreat 2011.
The papers are the Botanicals range from Craftwork cards along with co-ordinating elements and cardstock.Botanicals at Cardinal Colours Retreat 2011
Kit Contents.
1 x Scalloped DL card
1 x Elegant Square Card
1 x Scalloped Square
1 x Square card
1 x Top notch card
1 x Botanical Paper pack
1 sheet of Colour-me images
1 sheet in-circle messages
A5 sheet lime card stock
1m of ribbon
Additional items used:
Promarkers in China Blue, Cornflower, Lime and Pear.
SU Scallop punch and circle punch
Orange woodware circle punch
Retro daisy punch
Small daisy punch
Cropodile
Chalk Inks
Candi
Card One Using the scalloped DL card –
Using the blue text paper with floral border, cut a piece 9x18.5 cm so the border is at the bottom.
Trim your choice of colour me flower to approx 4.5x8.5 cm leaving a 2-3mm border around the text. Colour the image using the Promarkers. Punch scallop circle from lime card stock, punch circle from blue text from other half of original sheet (use the top edge) choose greeting and assemble. Take a lime scalloped rectangle and tie the ribbon around creating a knot on the left, trim ends. Add 3d foam to this and also the coloured image and add to top middle of card. Add the greeting also on 3d foam. Decorate the edges of the scalloped card with candi (with 3d foam pads)
Card Two - Using the square scallop card
Score the card 5 scallops in (vertically) to form the easel. Take the white floral paper and cut a piece 13.5cm wide, then cut again to 14cm. Colour random flowers with the promarker. Add the piece 13.5x14cm to the scored section and fold. Add the remaining piece to the inside bottom of the card. Cut a square 10x10cm from the lime card and from the remaining blue text paper a square 9x9xm as below.
Follow the same steps as card one to mount a message and add to the inside of the card on 3d foam to hold the easel open. Mount the blue text on the lime square and fix to the front of the card with double sided tape – only use on the lower half of the square. Trim a colour-me flower to approx 4x7.5cm and colour. Take a tag and punch a hole in the top. Using the cover sheet, cut a piece 6x6.5cm from the border strip and fix centrally onto tag.
Add the colour-me floral to the tag with 3d foam and the tag to the square on the card, also with 3d foam at an angle. Tie a small piece of ribbon through the hole and trim edged.
Card Three - Using the elegant square card –
From the green border sheet, cut a piece 7.5x12cm wide. Using the remainder of the white floral, cut two strips 12x2.25 cm. Stick to the card to form a 12cm square. Take a blue scalloped rectangle tie the ribbon around it with a knot to the right. Cut a floral colour-me to approx 4.5x8.5cm, colour with Promarkers, also high-light a few words in the text. Add 3d foam to both and fix to the left hand side of card. Using a ruler as a guide add candi to the right hand edge of the square with 3d foam, see below:
Cut the sheet of white text floral border to create a panel 10.5 wide by 11.5 high and stick centrally.
Cut 3 small circles from remnants of colour-me sheet and place in the centre of the flowers with 3d foam. Add Candi along the white raised strip and along the bottom of the card.
Card Five - Using the square card.
Use the scoring tool to score the card halfway and fold as below.
Cut a piece from the white text 14x7cm and stick on the flap. Cut the green text/floral border to 14x10cm wide and stick inside. Make a slit in the front fold just over 1.5 cm and thread the ribbon through, fix behind with double sided tape and then tie another piece of ribbon in knot on the front section. Colour a floral panel approx 4.5x8.5cm mount onto lime rectangle with 3d foam, repeat with rectangle onto front of card. Using remaining white text, punch one circle with the yellow woodware, one retro daisy, and five small pointed edge flowers. Punch a lime scallop and assemble as before. Add to right hand side and arrange the flowers around. Use a small circle (orange punch) in the centre of the daisy and Candi for the other flower centres.
Here is another card I made with the same materials:
I think the kits have sold out but Jill has many of the items used, please contact her at Cardinal Colours to enquire.


1 comment:
These are all really lovely - the colours go so well together.
Karen x
Post a Comment