Friday, 30 September 2011

Good Luck Cheryl....

Cheryl has retired this week so I was asked to make a card.
They had seen a card I made with the lady below but she had a brown bob hairdo so I cut the hair from another Paper Nation Image and stuck it over to try to create Cheryl's spikey blond cut. I highlighted this with ProMarkers.
The card is an 8x8" CWC card and the papers are from my Basic Grey Capella range.
The letters are also from the collection pack covered with glossy accents to accentuate them.
A ruffled seam binding edge was added to the left.


I used some Marianne dies and and cut flourishes and leaves which I added under some paper roses.


This is a close up of the lady, wearing the uniform shirt under her suit too!.
I added some pearls to her ears and buttons.


She is mounted onto another die-cut image from Marianne designs which cuts and embosses.
I used some Distress ink on a sponge to create the colour.

Good Luck Cheryl...

TFL
xxx

Tuesday, 27 September 2011

Birthday Cupcakes for Tracey and Sam...

Both Tracey and Sam, my new colleague at work, celebrated their birthdays last week, so I made them the following:
Vanilla Cupcakes with a raspberry swirl icing.
I heard (forgive me but I forget where) that if you add a line of colour inside the piping bag, that it creates a stripe so I gave it a go.


I added some wafer daisies.


I think the swirl works quite well, what do you think?


And also, carrot cake cupcakes with cream cheese frosting.
I found the recipe online.


The carrots on top are made from fondant icing.


They were delicious - even if I say so myself!

Why not have a go and let me know what you think?

Linda
xx

Monday, 26 September 2011

Paper Patchwork - As taught by S-J at the Retreat.

There wasn't a lot of spare time for Lynn and I at the retreat as we were either assisting or teaching classes and M&T's. I really enjoyed S-J's classes last year and asked Jill if I could have kits to do at home later on.
As it turned out we managed to sit in and do the following layout :)
I had to add the photograph afterward as I hadn't taken any with me. This was taken at the hotel of a huge mirrored head like a disco ball.
The kit consisted of a 12x12" piece of kraft paper, a selection of 8x8" patterned papers, Glitz Design - Laced with Grace.


The technique is very simple but very effective.
We cut the patterned papers into 3" squares, inked the edges then stuck them onto the kraft paper to form a grid.  Embroidery thread was used to add random "X" stitches. We punched a couple of hearts and then tore some circles to create flowers adding large jewells to the centres. Butterflies were punched and added along with a title from Prima Thickers.
I enjoyed the class so much... I made a double page...


This is S-J's original layout.

Check with Cardinal Colours for stock of these papers and embellishments.

TFL
xxx

Sunday, 25 September 2011

And Desk Ted came too!

Desk Ted came along to Eastbourne to assist at the Cardinal Colours retreat too.
On the Thursday evening we went to the Tin Mine for dinner and below you can see him with Jill and a J2O.

No Desk Ted, it doesn't need salt!

Helping Lynn drink her wine!


Choosing his dinner...


Ice-cream for pudding....


And Eton Mess...


And Lemon Frangipane Tart!!!!


And more wine - from the bottle Ted???


Assisting with Anita's Canvas Class. 


And our Sepia card class...


Helping Liz (and wearing her glasses!)


The photo looks dark but the lighting was perfect?


Assisting Ann and Linda in our Lauderdale class.


And Scrappy Sarah....


And Tina...


At lunch on the last day, Ted you look like you're having a good time - but surely not more food?

Thursday, 22 September 2011

Paint Fusion Poppies at Cardinal Colours Retreat 2011

Jill wanted some ideas for make and takes at the retreat and I had seen the paint fusion stamps and paints and really fancied having a go. 
I bought the things back from a crop and watched the DVD - which, incidentally, says the the poppies are "more advanced class" - typical me!
These are the results of my first attempts.


I was quite pleased with the results but felt the stark white background was too harsh.
I thought of trying the crackle backgrounds etc on the DVD but didn't really have the time to further that idea. I then saw on Create and Craft some mountboard shapes by Sheena Douglas which look really nice - hearts and tags so I ordered them. This set me thinking and I came up with the plan for the retreat - make bookmark sized rectangles on mountboard.
Lynn got an A1 sheet at Hobbycraft for me which Robert then cut to size.
I spent Sunday morning stamping them as below.


As the mountboard is creamy colour it gives a better background.
I painted in the poppies and leaves and allowed to dry.
The edges were inked with a brown chalk pad then I made a couple of masks with post-it notes for the flower heads.
Once dry, I added the masks then stamped over the background with "early espresso" ink pad from Stampin' Up and an old text stamp I had. I blotted the stamp first to give a lighter image.
I then added a couple of swirls with "rich razzleberry" by SU also blotted first.


This is one of the heart shapes I made in the same way.


Stamps, Paints, Brushes and DVD all available from Cardinal Colours along with other exciting products.

I now have some Christmas stamps so will be making more soon (I hope!).

Thanks to Jill for organising yet another fabulous retreat - if you went along, I hope you enjoyed it too.
Stop by and say Hi!

TFL
xxx

Wednesday, 21 September 2011

Canvas Masterclass by Anita.

Anita taught a fantastic canvas class at the Cardinal Colours Retreat 2011.

See here for the original.

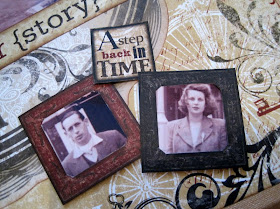
This is my version which I created using a photograph of my parents looking very young!
Lynn and I made ours prior to the retreat so we could assist (or hinder??) Anita on the day.


Thanks Anita for creating such a beautiful treasure, Dad loved it.

TFL
xxx

Tuesday, 20 September 2011

Botanicals at Cardinal Colours Retreat 2011

These are the cards designed for a class at Cardinal Colours Retreat 2011.
The papers are the Botanicals range from Craftwork cards along with co-ordinating elements and cardstock.


Botanicals at Cardinal Colours Retreat 2011

Kit Contents.
1 x Scalloped DL card
1 x Elegant Square Card
1 x Scalloped Square
1 x Square card
1 x Top notch card
1 x Botanical Paper pack
1 sheet of Colour-me images
1 sheet in-circle messages
A5 sheet lime card stock
1m of ribbon


Additional items used:
Promarkers in China Blue, Cornflower, Lime and Pear.
SU Scallop punch and circle punch
Orange woodware circle punch
Retro daisy punch
Small daisy punch
Cropodile
Chalk Inks
Candi

Card One Using the scalloped DL card –


Using the blue text paper with floral border, cut a piece 9x18.5 cm so the border is at the bottom.


Trim your choice of colour me flower to approx 4.5x8.5 cm leaving a 2-3mm border around the text. Colour the image using the Promarkers. Punch scallop circle from lime card stock, punch circle from blue text from other half of original sheet (use the top edge) choose greeting and assemble. Take a lime scalloped rectangle and tie the ribbon around creating a knot on the left, trim ends. Add 3d foam to this and also the coloured image and add to top middle of card. Add the greeting also on 3d foam. Decorate the edges of the scalloped card with candi (with 3d foam pads)

Card Two - Using the square scallop card


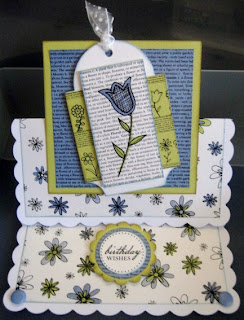
Score the card 5 scallops in (vertically) to form the easel. Take the white floral paper and cut a piece 13.5cm wide, then cut again to 14cm. Colour random flowers with the promarker. Add the piece 13.5x14cm to the scored section and fold. Add the remaining piece to the inside bottom of the card. Cut a square 10x10cm from the lime card and from the remaining blue text paper a square 9x9xm as below.

Follow the same steps as card one to mount a message and add to the inside of the card on 3d foam to hold the easel open. Mount the blue text on the lime square and fix to the front of the card with double sided tape – only use on the lower half of the square. Trim a colour-me flower to approx 4x7.5cm and colour. Take a tag and punch a hole in the top. Using the cover sheet, cut a piece 6x6.5cm from the border strip and fix centrally onto tag.


Add the colour-me floral to the tag with 3d foam and the tag to the square on the card, also with 3d foam at an angle. Tie a small piece of ribbon through the hole and trim edged.
Card Three - Using the elegant square card –


From the green border sheet, cut a piece 7.5x12cm wide. Using the remainder of the white floral, cut two strips 12x2.25 cm. Stick to the card to form a 12cm square. Take a blue scalloped rectangle tie the ribbon around it with a knot to the right. Cut a floral colour-me to approx 4.5x8.5cm, colour with Promarkers, also high-light a few words in the text. Add 3d foam to both and fix to the left hand side of card. Using a ruler as a guide add candi to the right hand edge of the square with 3d foam, see below:


Card Four - Using top notch card.


Cut the sheet of white text floral border to create a panel 10.5 wide by 11.5 high and stick centrally.


Colour the floral border with the Promarkers. Using the leaf trim from the colour-me sheet, cut a strip 10.5x1.5cm and fix, white side up, with 3d foam above the floral panel. Using the leaf side, trim tightly to the leaves and cut into small strips, stick above the white strip. Using the green text/floral paper punch 3 retro daisies, shape the petals and fix to the tops of the leaf strips.

Cut 3 small circles from remnants of colour-me sheet and place in the centre of the flowers with 3d foam. Add Candi along the white raised strip and along the bottom of the card.

Card Five - Using the square card.


Use the scoring tool to score the card halfway and fold as below.


Cut a piece from the white text 14x7cm and stick on the flap. Cut the green text/floral border to 14x10cm wide and stick inside. Make a slit in the front fold just over 1.5 cm and thread the ribbon through, fix behind with double sided tape and then tie another piece of ribbon in knot on the front section. Colour a floral panel approx 4.5x8.5cm mount onto lime rectangle with 3d foam, repeat with rectangle onto front of card. Using remaining white text, punch one circle with the yellow woodware, one retro daisy, and five small pointed edge flowers. Punch a lime scallop and assemble as before. Add to right hand side and arrange the flowers around. Use a small circle (orange punch) in the centre of the daisy and Candi for the other flower centres.

Here is another card I made with the same materials:


I think the kits have sold out but Jill has many of the items used, please contact her at Cardinal Colours to enquire.